Tutorials
For a general description of MitoMiner, the data it includes and its capabilities, please see the about page.
The following tutorials explain the basic functions of MitoMiner, such as acccessing and handling MitoMiner data, and provide a basic introduction to the query builder. If you have any questions that are not answered by the tutorials please contact us at mitominer [AT] mrc-mbu.cam.ac.uk.
Tutorial 1. Quick Search
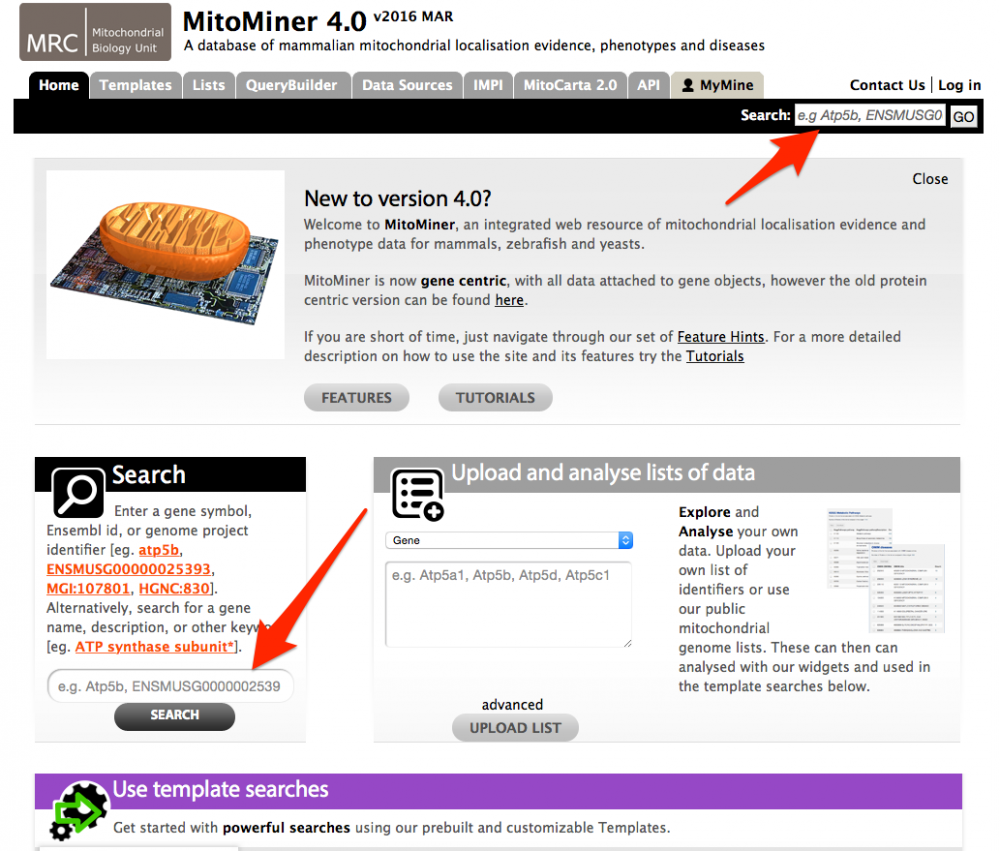
The Quick Search function provides a basic search facility for the data contained within MitoMiner and provides a good way to browse the database. The Quick Search function can be found on the front page and on the main menu bar, which is present on all pages. You can search for an ID or description for most parts of the database. Wild cards (*) can be added to increase the range of a quick search.
Tutorial 2. Report page
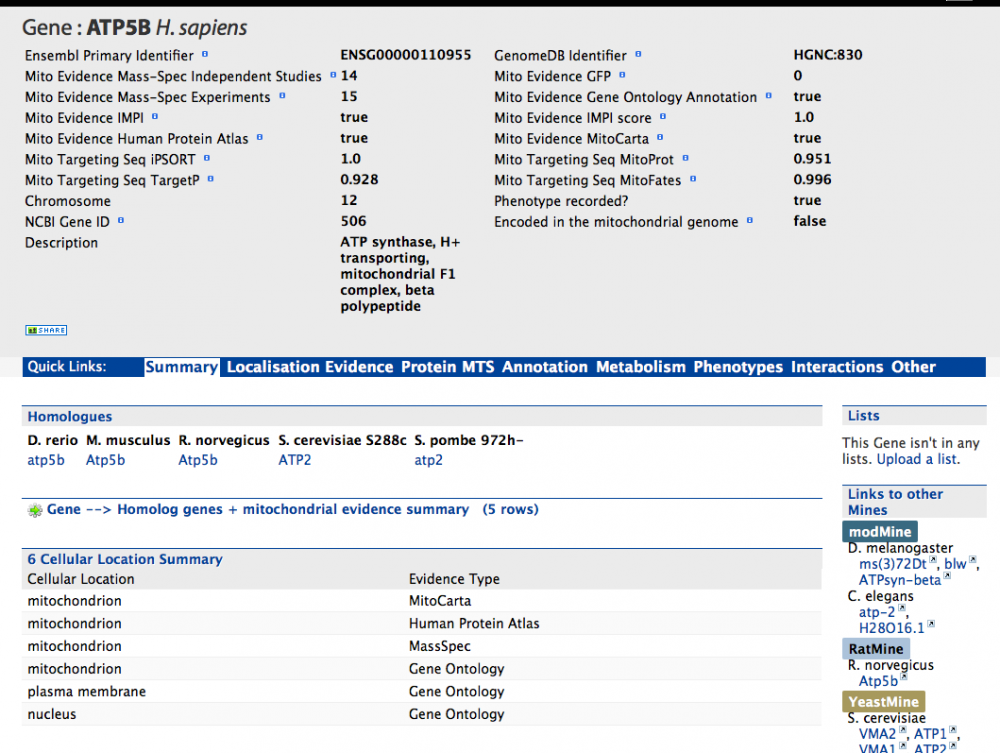
Each entry within MitoMiner has a report page. This page serves as a summary of all the information present within the database that relates to that entry and provides web links to external resources such as the Ensembl and GeneCards databases.
All report pages have the same basic structure: The top part provides basic information for the entry itself, whereas the lower part shows information from other data sources that are relevant to this particular entry. The 'Quick Links' bar across the middle moves the page to the differect data source sections below. The 'External Links' section provides web links to external databases and the 'Lists' section shows any lists which have this entry including lists you have created yourself.
As an example the report page for gene ATP5B in human, is shown below. The summary at the top provides a brief overview of the gene. This includes basic information such as identifiers and its chromosome as well as various 'Mito Evidence' categories. These categories are gene specific and show a summary of the mitochondrial evidence for that gene, such as the number of mass-spec entries which have identified proteins encoded by this gene, whether it is annotated as mitochondrial in the Gene Ontology, and whether it is in the IMPI reference set of mitochondrial genes.
Below this summary is information from other data sources that are relevant (linked) to this particular gene. For example the 'Summary' sections shows homologs of the gene and the Gene Ontology annotation can be found in the 'Annotation' section.
The 'External Links' section in this case contains a web link to the relevant entry in the GeneCards database. Above that is the 'Lists' section, which shows this protein is in several lists such as the IMPI Reference set list. If you have created any of your own lists (see tutorial 5) a button will appear that will alllow you can add this particular entry to it here (as long as it is of the same type).
Tutorial 3. Running a template query
MitoMiner contains various prebuilt 'template queries' to make it easier to use the database. These queries are envisaged to be the most common queries required by a typical user and often span multiple data sources. Template queries can be run "as is" or can be further modified to meet particular requirements by using the query builder (see tutorial 7).
Template queries can be found in three places:
1. Front Page. The most popular queries in MitoMiner (based on usage) can be found in the middle of the front page, grouped by type.
2. Template tab. This page is found on the main menu bar and contains a searchable list of all the queries in MitoMiner including any queries you have created yourself (see tutorial 7).
3. Data tab. This page can also be found on the main menu bar and contains various data categories that make up MitoMiner (see tutorial 6). Each of these data categories contain relevant template queries for that source.
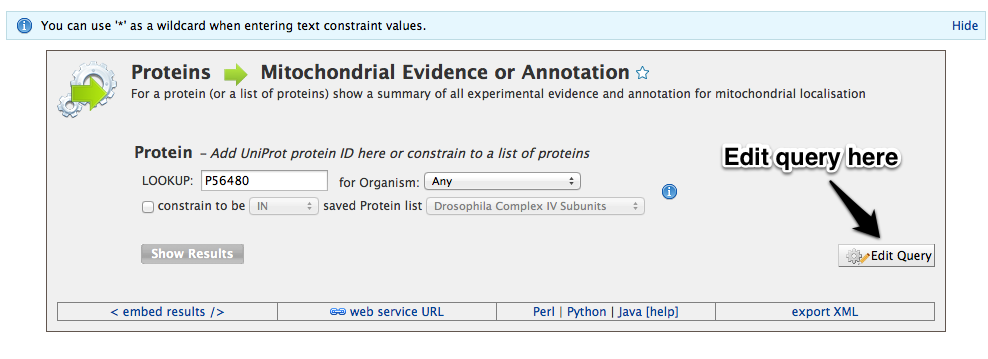
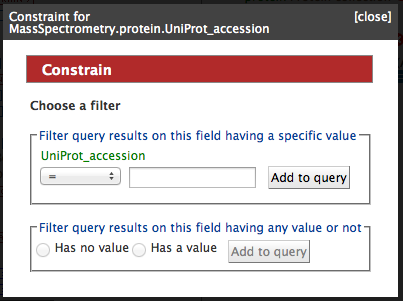
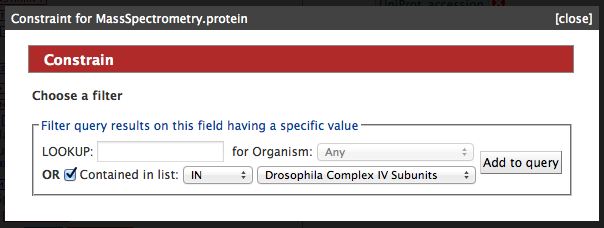
Once you have selected a query, a screen similar to the screen shot below is presented. Before the query can be run, various constraints need to be added such as a search term (e.g. a gene ID), or an option needs to be selected from a drop down box. Wildcards (*) can be used to widen a search term ( e.g. P5648* ). Some constraints have a yellow background in the box, and these automatically search for compatible terms as you type. For example in queries that search using GO annotation, to find a compatible search term just start typing a term, such as kinase, and it will automatically show a list of all the vaild options. Then just click on one of the options to set the constraint.
Using a list
Some template queries can also be run using compatible lists, such as lists of gene identifiers for gene queries (see tutorial 5 on how to create your own list). To use a list first tick the checkbox next to the 'constrained to be' and then select a compatible list from the dropdown box. Any compatible lists you have created yourself will be shown at the bottom of the dropdown.
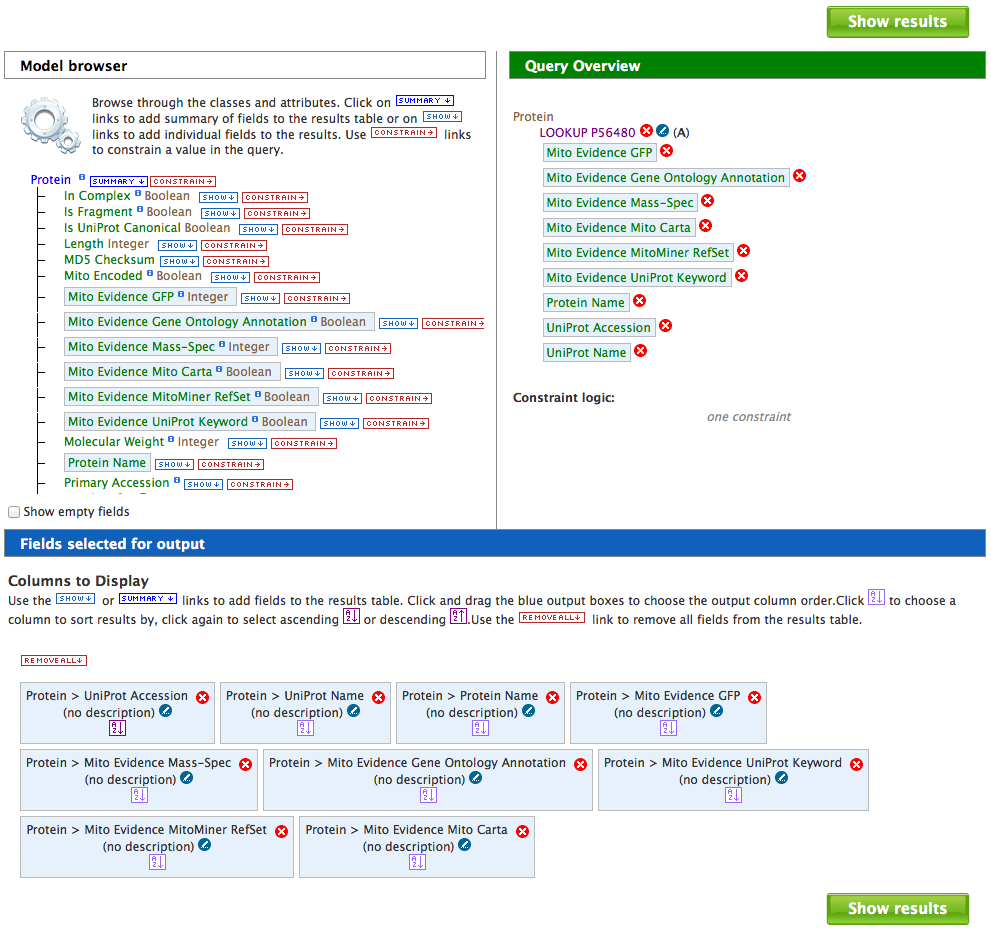
Once the constraints have been chosen the query can be run by clicking on "Show Results" button. The results page is discussed in the next tutorial. If the query does not exactly match your requirements it can be edited using the query builder by using the "Edit Query" button (see tutorial 7).
Tutorial 4. Results Page
The results of a template query are displayed as a table. An example of the results page is shown below. Any entry in the table that is highlighted in blue can be selected to bring up the report page. At the top right of each column title box is a small button that produces summary statistics for that column.
Above the table is a menu bar with various options which allows page navigation, the page size to be changed and the addition of further columns.
Any entry that has a preceding checkbox can be saved to a new list or an existing one. Either select the entries individually, or tick the checkbox on the table header to select all. Then select the 'Create List' or 'Add to List' buttons on the results menu bar above the table. More information regarding lists and the MyMine feature can be found in the following tutorial.
The Export results section allows the table to be exported in comma separated or tab separated format which is compatible with most spreadsheets including MS Excel. If proteins are in the results you can 'Export to Fasta' to export the sequences of the proteins in the table in FASTA format.
Tutorial 5. Uploading and analysing a list
Lists
All queries in MitoMiner can be performed on lists of identifiers (such as gene IDs). These can be existing lists in MitoMiner (such as the IMPI reference set list) or lists that you create yourself. Lists can either be created from a results page (tutorial 4) or from uploading your own list into MitoMiner. These lists can then be used as search terms in compatible template queries as well as in the Query Builder (tutorial 7). In addition various functions can be performed between lists such as union, intersect and subtraction, and all lists can be exported from MitoMiner.
How to upload your own list
Any identifiers that are compatible with MitoMiner (Ensembl IDs, UniProt IDs, KEGG IDs, Gene symbols etc.) can be uploaded into MitoMiner as lists.
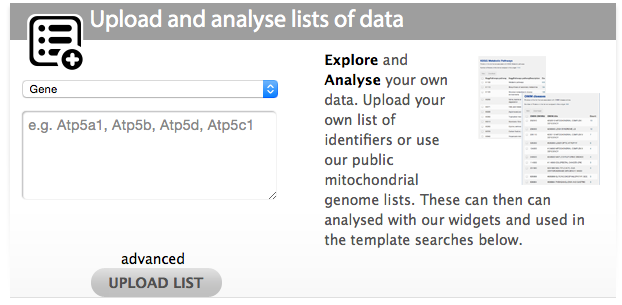
There are two ways to upload lists in MitoMiner. The first way is by using the quick list uploader on the front page. Select the type of list from the dropdown and paste or type in your identifiers in the box. The identifiers should be separated by a comma, space, tab or new line. Then click the 'UPLOAD LIST' button.
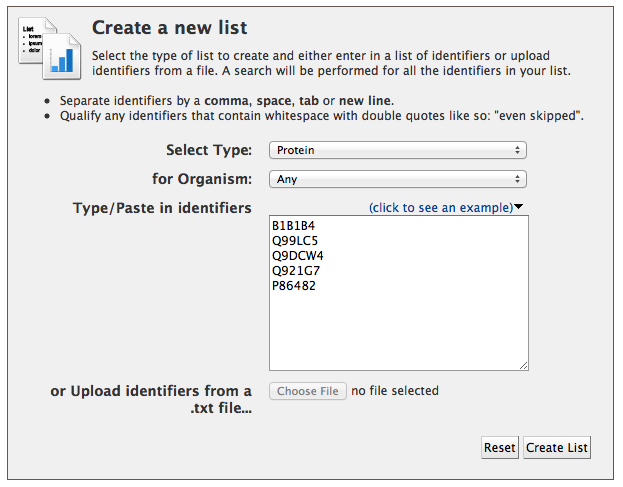
The second way is using the advanced list uploader. This can be found either on the front page by clicking the advanced link at the bottom of the list uploader box or by going to the 'Lists' tab on the main menu bar. Select the type of list you want to create from the dropdown box (this includes many more types than the quick uploader). Optionally you can also set the organism for your list of identifiers - this is useful if you have, for example, gene symbols in your list, which may appear in more than one organism. A list of identifiers can then be typed, cut and pasted into the text box, or uploaded from a text file (Excel files are not supported). As before the identifiers should be separated by a comma, space, tab or new line. Then click "Create list". It is not possible to create a list containing different types of entry, such as proteins and genes, but it is possible to have a mix of types of identifier for the same type of entry (e.g. a list of proteins may contain both UniProt primary accession numbers and UniProt names).
With either method when the list is uploaded all of the identifiers will be compared against the MitoMiner database and identifiers with no match will be reported on the "Before we show you the results" page.
Finally choose a name for your list and then click 'Save a list of...' button. This will produce a results table of your uploaded identifers.
Widgets
For certain types of list 'widgets' will be shown under the results table. These widgets provide different types of analysis on the list such as:
- The Gene Ontology widget shows annotation terms that are enriched in the list compared to a background population (this can take some time for very large lists so please be patient)
- The OMIM widget shows how many entries in the list are associated with specific human disorders.
- The KEGG pathways widget shows all pathways from KEGG that are associated with proteins in the list, and how many proteins are associated with each pathway.
Viewing uploaded lists
To view lists after they have been upoaded go to 'Lists' page on the main menu bar and select 'view'. Lists you have created yourself are shown at the top of the page. Alternatively lists that you have created yourself can be accessed through your MyMine page (tutorial 8). Both pages contain a menu that allows lists to be copied and deleted as well as functions such as union, intersect and substraction to be performed between lists.
Using a list
Once a list has been uploaded it can be used in all compatible queries as described in tutorial 3.
Tutorial 6. Data categories
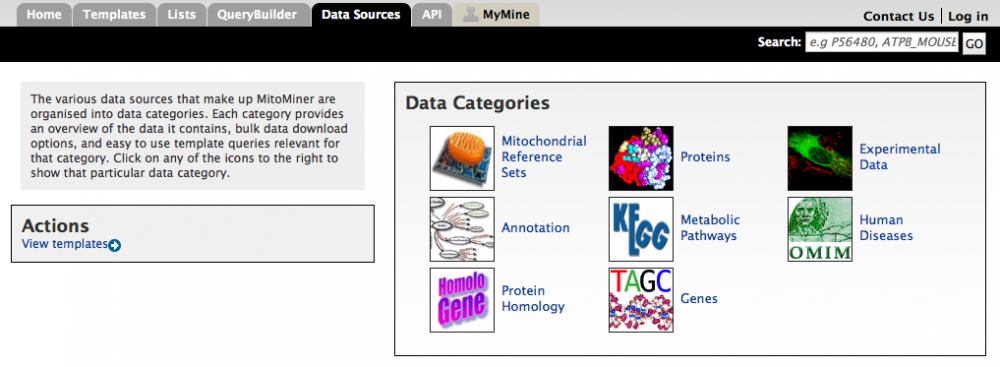
The various data sources that make up MitoMiner are organised into data categories. These categories can be accessed from the 'Data Sources' tab on the main menu bar.
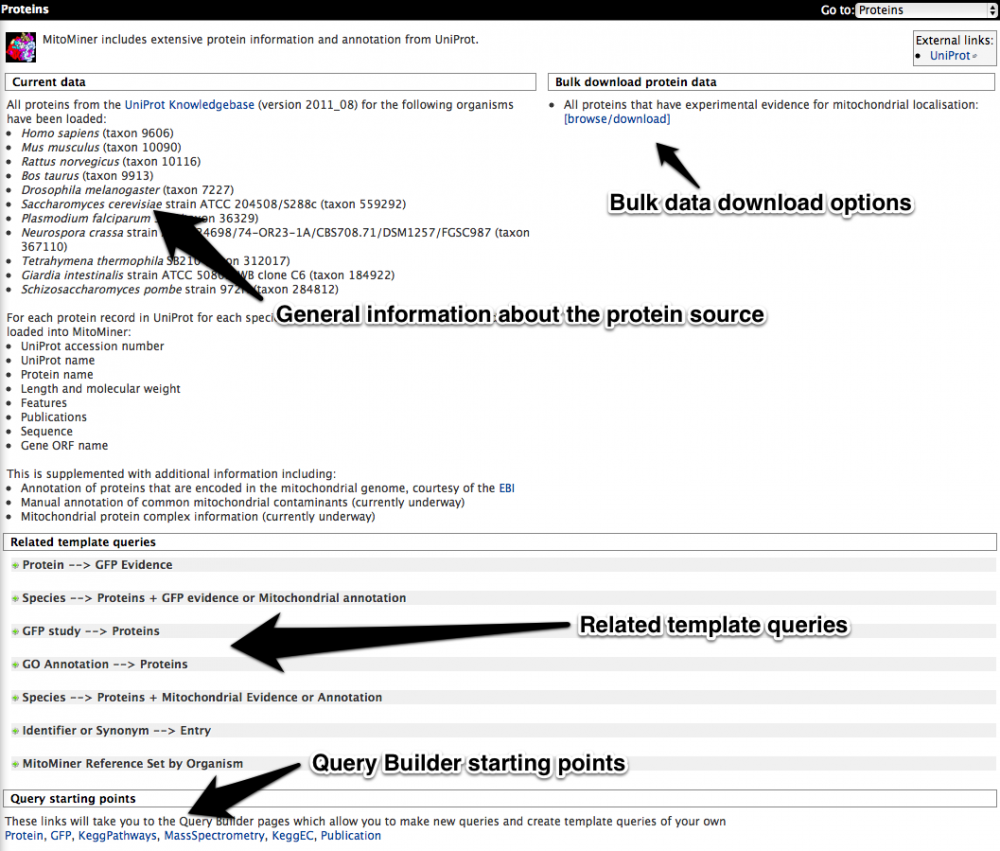
Each data category page consists of four different sections:
1. The first section provides a brief overview and description of the data category, and information such as when it was last updated and the type of data included.
2. The second section is configured to provide bulk download options for the data source. MitoMiner allows this data to be exported as a comma or tab delimited values, which is compatible with most spreadsheet programs including MS Excel.
3. The third section contains a selection of template queries (described in tutorial 3) that are relevant to that data source. These queries are envisaged to be the most common queries required by a typical user. These template queries can be run "as is" or can be further modified to meet particular requirements by using the query builder.
4. The fourth section is configured to provide pertinent starting points to create new queries from scratch using the query builder.
As an example the Protein data category is shown below. The first section provides details such as the version of UniProt used and the various different species loaded. The second section allows the bulk download of "all proteins that have experimental evidence of mitochondrial localisation". The third section contains relevant template queries such as "Proteins --> Mitochondrial Evidence or Annotation". The fourth section contains aspect relevant starting points for the query builder such as protein or GFP.
Tutorial 7. Build you own query using the Query Builder
Tutorial 8. MyMine - Store lists and queries
All lists and your queries history will be saved temporarily in MitoMiner for the current session. To save them permanently a MyMine account is required. A MyMine account also allows queries created in the query builder to be saved. It is also possible to export/import queries and templates as XML to share them with others. Your saved data is always private. To create a MitoMiner account no other information is required other than an email address and a password. To create an account or log in to an existing account use the "Login" button on the menu bar.
Tutorial 9: The MitoMiner API
Advanced users may wish to write their own scripts to run queries in MitoMiner directly, and MitoMiner provides APIs to allow this. We currently have Perl, Python, Java and Ruby APIs available. Further documentation is available on the InterMine wiki. Should you wish to use the API without creating your own scripts, the bottom menu bar, which can be found on the Query Builder and Template Query pages, provides the code for the language of your choice.
